Firs obtain the latest version of TECOAS from the TECOAS website.
Read also the files README and
sobalight.html in the distribution.
In the following, we assume that the contents of the distribution
(tecoas-0.*.zip) have been unpacked in the
${TECOAS_HOME} directory.
You may need to configure TECOAS by editting the
tecoasrc file, which resides in
${TECOAS_HOME}.
By default, all contents are commented out, and a default behaviour is
selected.
Most contents can be left unchanged, but you may need to change the
setup for gs.
# Where to find ghostscript #gs=no # no ghostscript (requires server) #gs=gs # Unix or Cygwin (default) #gs=gswin32c # Windows #gs_device=png16m #gs_paper=a4 |
The default is to call the gs command.
If no ghostscript is available on your system, of if it does not work
properly, you must uncomment the line gs=no (but at least
one of the participants in a TECOAS session must have a working
Ghostscript).
If you are using the gswin32 version of Ghostscript, you must uncomment
the line gs=gswin32c.
Incorrect configuration of this parameter will result in an error
message when you open a Postscript or PDF file.
You may also override the tecoasrc file by putting a copy
of it in your home directory, renamed as .tecoasrc; in
that case only .tecoasrc will be read, and the original
tecoasrc is ignored.
$, > indicate shell and console command
prompts.)
$ cd ${TECOAS_HOME}
$ java -jar sobalight.jar
|
Inside explorer, go to the ${TECOAS_HOME} directory,
and double-click on sobalight.bat
> start 8383 NOSTATE |
$ cd ${TECOAS_HOME}
$ java -jar sobalight.jar -no-console server.sol
|
> connect <server name> 8383 > load viewer.sol |
Alternatively, one can edit the master.sol script,
and run it directly (on unix).
> connect <server name> 8383 |
Alternatively, one can edit the client.sol script,
and run it directly (on unix) or through double-clicking
client.bat.
ssh, this is possible by having all
remote participants do:
$ ssh -L8383:<server name>:8383 <ssh server> |
Then they must replace "connect <server name> 8383"
in the above by "connect localhost 8383".
If you want to test TECOAS alone, you can do it by running the
standalone.sol script or double-clicking on
standalone.bat.
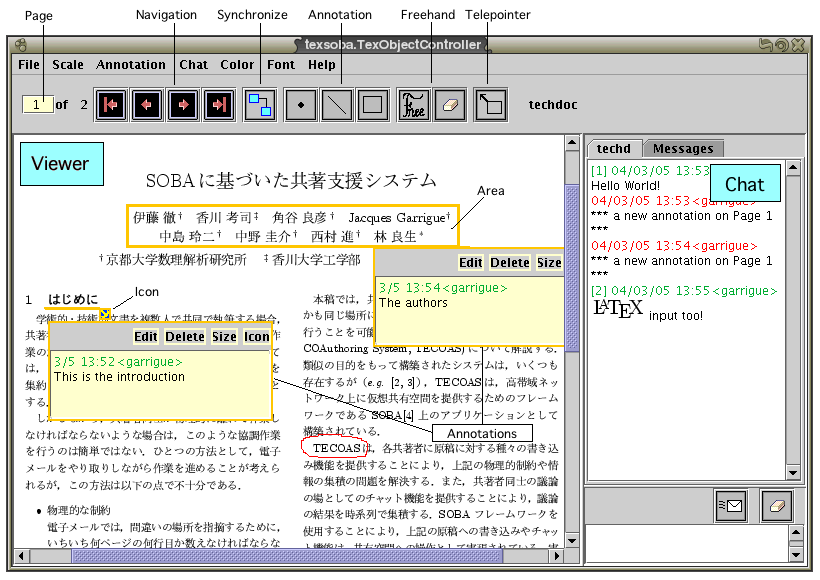
TECOAS is composed of a Viewer component and a Chat component.
When you start TECOAS, the TECOAS logo appears in the Viewer window. First, one of the participants must open a document by selecting [Open File] in the File menu. Postscript and PDF formats are supported. Then all participants may use the following functions.
By pushing the navigation buttons, you may change the page currently displayed in your viewer. You can also directly input a page number in the page field.
With TECOAS, one can add annotations to a shared document. Annotations apply to a region which can be a point, a line, or a rectangle. Here are the steps to add an annotation.
One an annotation has been added, you can [Edit] or [Delete]. When somebody is editting an annotation, his name appears in the annotation title.
Annotations are automatically saved, and will appear the next time you open the same document. However, any change in a document will cause it to be seen as different by TECOAS.
You can draw explanations on top of a document.
Graffiti are not saved. They will disappear the next time you open the same document.
Annotations and graffiti are shared between all participants, but you cannot be sure that they are looking at the same page. By pressing the synchronization button, you can force other participant to go to the same page.
Participants who are editting an annotation, or who have disabled synchronization, will not be synchronized.
The telepointer functionality is available to show your pointer to other participants (when it is inside the viewer area). It is mainly useful if other participants can hear your voice, since otherwise you have to move the pointer to write chat messages.
Click once the telepointer button to enter telepointer mode, and once again to end telepointer mode. When in telepointer mode, you can see a label with your name following the mouse pointer.
The Chat window is composed of two parts. The upper part is a log of past chat messages. The lower part allows you to edit a message before you send it. When you press the [Send] button, you message is sent to all participants. You can also clear the edition window with the [Clear] button, or insert images with the [Insert Image] option of the Chat menu.
Another tab named "Messages" is also present in the upper part.
It is intended to let you check the behaviour of subprocesses
(gs or latex) launched by TECOAS.
Both in annotations and in chat messages, you can also input mathematical formulas.
$".
$\pi > 3$
Mathematical formulas may be copied and pasted like normal text.
By default, you cannot quit TECOAS, as this would shutdown TECOAS for all members. You should rather press the Exit button of the SobaLight console. Note that if there are still some participants in the station, you can reenter it at anytime as a client, and will share all annotations and chat.
You may use TECOAS inside the Generic Application bundled with the
SOBA Framework.
But first you need to do some configuration.
In the following, we will refer to base directory of the SOBA
installation (by default
C:\Program Files\SOBA Project\SOBA*) as
${SOBA}.
This procedure was tested on the version 1.1.2 of the SOBA Framework.
Some TECOAS files must be added to the Generic Application.
tecoas.jar file to the ${SOBA}/apps
directory of the SOBA Framework.
shared-context-tecoas.xml file
to the ${SOBA}\home\system\appli\ directory of the SOBA
Framework.
The tools one can use in the Generic Application are listed in the file
${SOBA}\home\system\config\win32\applications.xml.
You shall edit this file in the following way.
${SOBA}\home\system\config\win32\applications.xml
(The added part is in red)
[...]
    <SharedObject uri="SobaAP:Chat" context="shared-context-chat.xml"
                  class="org.soba_project.application.component.chat.ChatSharedObject"  />
    <SharedObject uri="SobaAP:Browser" context="shared-context-browser.xml"
                  class="org.soba_project.application.component.browser.BrowserSharedObject"  />
    <SharedObject uri="SobaAP:ResourceManager" context="shared-context-rsmgr.xml"
                  class="org.soba_project.application.component.rsmgr.RsMgrSharedObject"  />

    <SharedObject uri="Texsoba:Viewer" context="shared-context-tecoas.xml"
                  class="texsoba.TexObject"  />

  </shared-objects>
</applications>
|
We assume that all members have already started the SOBA Frameworks,
and share a session.
(See the Generic Application Guide at INCPOD for details.)
If TECOAS was correctly installed, then it should appear in your Toolbox.
One member should start TECOAS, after that you can use exactly as with
SobaLight.
gs".
If it doesn't work, but you are sure to have Ghostscript on your
system, you may have to change the PATH environment
variable, or the executable name in tecoasrc.
It may also be that your version of ghostscript does not support
PDF. You may look at the messages caused by Ghostscript in the
Message tab of the Chat area.
tex_user_preamble"
field of your tecoars
Your commands may go on for several lines if you end each line
by a backslash.
These command will be inserted are the context of the
"tex_preamble" field.
shared-context-tecoas.xml is in the
${SOBA}\home\system\appli\ directory.
${SOBA}\home\system\config\win32\applications.xml
is correct.
${SOBA}\home\system\config\applications.xml
is correct.
tecoas.jar was really copied
under ${SOBA}\apps.
Send bug reports to tecoas@kaba.or.jp.
This latest version of the TECOAS documentation is available online.